Sunday, December 20, 2015

N's Hand Woven Teacher's Scarf

N's teacher loved her Christmas scarf in school colors.  N used the 4-shaft Kessenich table loom and Encore yarn in gold and purple.  The scarf turned out so pretty!

 She did a great job weaving!  This picture is the scarf drying after hand washing it and before trimming the fringe.

K's Hand Woven Scarf for his Teacher

K's hand woven scarf turned out so nice for his teacher!  I love the colors, and it's nice and soft. 

K used the Structo 4-shaft table loom.  It was made in 1947, and I've restored it.  It works very well.
The yarn is 3 balls of Paton's Kroy Sock yarn FX with a size 12 reed (12 EPI).  The pattern is a basic twill pattern. 

K's Hand Woven Scarf for her Teacher

K did a great job weaving her scarf for her teacher!  She used the 8-shaft Kessenich table loom.  The scarf is made out of 3 balls of Paton's Kroy Sock yarn in Cameo Colors in a twill pattern.

The scarf is soft and very pretty.

Notes: 3 balls Paton's Kroy Sock FX 4 ply, Cameo colors. 50 g. 166 yards.  98" warp. 12 x 8 = 96 ends + 2 floats.  Twill pattern: 1,2,3,4. 24 heddles per shaft.  12 dent reed.  8" in warp.  About 7" wide finished.  About 60" long. 

Gingerbread Girl Hats for K and N!

Here are the girls in their Gingerbread Girl Hats.  K wanted a red bow on her hat, and N wanted a big pompom.  The pattern is from Repeat Crafter Me. 


Notes:
Ks Gingerbread Hat: I used the adult size. 66 HDC. Length 7.5” plus 1 round of SC. A little big. So cute! Added a little strip of crochet around the bow after taking yarn around the center of the bow. Strip of center bow: Chain 4, 3 sc in row, chain 1. Do about 5 rows and sew around center of bow. Tack well onto hat. Smile is Lazy Daisy stitches with needle and yarn. Top frosting is chains sewn down.
N's hat:  Adult size made smaller in length. Stop after Round 8. 60 HDC. Then HDC around until 7.5” long. Finish with a round of SC. N wanted a big red pompom instead of a bow. I made the largest size on my pompom maker. Cheeks: add 1 round of SC to finish the the cheeks. Use the tail at the end to sew onto the hat.
Icing on head: Make a long crochet chain. Use the beginning tail to sew the chain onto the hat. Use knitting safety pins to pin the chain in place around the hat. Take the beginning end down through the hat and overlap the beginning and end chain one chain.
I used a Daisy chain and tapestry needle to make the mouth. Cotton thread on the buttons for eyes.
So cute! N’s Gingerbread Girl hat from a few years ago is now too small, so this one will replace her old hat. H hook, Vanna yarn.

Thursday, December 10, 2015

Blonde Brownies

Here's the recipe for Blonde Brownies that I brought to the guild holiday party which I promised to post on the blog.  It's from an old church cookbook from the 1970s and is a family favorite.

Blonde Brownies
1 cup butter
2 cups light brown sugar, packed
2 large eggs
1 tsp. vanilla
2 cups flour
1 tsp. baking soda
1 (12 oz.) package semi-sweet chocolate chips
1 cup pecans, optional

Preheat oven to 350 degrees.  Stir the baking soda into the 2 cups of flour and set aside.
Beat the butter and brown sugar well.  Beat in the eggs and vanilla.  Mix in the flour with baking soda.  Stir in the chocolate chips and nuts, if desired.  Bake in a well-greased 9" x 13" pan for 25 to 35 minutes.  It will be golden brown on top.  Cool and then cut into squares.  Yield: 24 squares. 

Sunday, November 29, 2015

N in her Shaun the Sheep Hat!

Here's N in her Shaun the Sheep Hat.  She loved the Shaun the Sheep movie, and she loves the Shaun the Sheep dvds.


The Shaun the Sheep face is duplicate stitched onto my own hat pattern that I knit for the kids.  Yarn is Vanna white and black.  Length 7.5".  Size 5 and 7 needles.

Pottery Class--Glazing our Pottery Nov. 28 at Rock Island Trading Post

We had a great time glazing our pottery pieces that we made on Sept. 26 at the Rock Island Trading Post in Rosebud, Mo..  It was interesting to see how the pieces had changed after John fired them.  The edges of my decorative dish shrunk down quite a bit, and Kathy S.'s pie plate's edges also shrunk down.  She made a pretty bowl, too. 

Doris also made a decorative dish, and hers has feet on the bottom of it.  RhonnaLeigh made a beautiful butter dish with a butterfly on top, and Debbie made a beautiful bowl on the wheel and also a spoon rest.  We used our extra clay to make small ornamental pieces for decorations.  Doris is using hers for the baskets she makes. 

Here's Doris glazing her pieces, and to her right is Debbie's bowl and spoon rest.  Doris was working on small pieces for her baskets.

Debbie is glazing her pieces a beautiful red color to match her kitchen.  RhonnaLeigh also glazed her butterfly butter dish in a beautiful red color, and she was working on some small pieces while Kathy S. was talking to her.
Here's RhonnaLeigh's beautiful butterfly butter dish.


Doris and I glazed our decorative dishes in mint green, which is a translucent color, with teal on the rim. We chose a lighter translucent color so the leaves we stamped in the clay will show through.

It will be really interesting to see the pieces after John does the final firing.  We had a lot of fun glazing our small decorative pieces.  I'm using mine for Christmas ornaments. 

 We've really enjoyed making the pottery together as a group and can't wait to see the finished pieces.  Debbie is bringing clay home to make more pieces for gifts.


N in her Wonderful Wallaby

I finished N's Wonderful Wallaby and gave it to her at her sister's basketball game recently.  N had been running around playing and was hot, but she tried it on and modeled it for me.  She looked so cute.  She was wearing a huge shirt that day because the kids had all gone on a field trip to the Science Center, and they were all wearing matching oversized T-shirts. 


Notes:
 Size 8. Lengthen sleeves and body to wear longer. Size 6 needle for cuffs, size 8 needle for body. Body of sweater: 13.5”. Sleeves: 13.5”. Front neck garter stitch: Knit last row. Dec.row, Purl 10. Knit row. Dec. row, purl 10. Last Dec. row stop at center of 10 stitches. 1. WS purl 5 instead of knit, Purl across, Knit last 5. Hood make a little longer: 10 inches.


Nov. 14--Making Candles at L's Cabin

We had so much fun making candle's at L's cabin.  L's cabin is an original Missouri log cabin that was moved log by log and restored on L's farm.  She and her husband added an upstairs to the cabin and porches.  The view from the back porch is gorgeous with rolling hills, pasture, and trees.  Her sheep were out in the pasture enjoying the nice November day.


Linda had the wood burning stove going inside where it was nice and warm.  We had L's delicious homemade soup and homemade bread for lunch.  We also brought cookies for our cookie exchange, and they were all yummy.  The inside of the cabin has been decorated to look like you are stepping into an 1800's log cabin.
 
 We each made 2 candles.  We used soy wax heated to 240 degrees using an electric deep cooker.  We placed the wicks inside pint-sized canning jars.  For one candle, we used green coloring and Christmas scent.  For the other candle, we used red coloring and cloves scent.  We decorated the candles with cloves, cinnamon sticks, and jingle bells.  They turned out so pretty. Thank you so much, L!  We had such a wonderful time, and our candles look so festive!


Thursday, November 12, 2015

N in her Snoopy Happy Dance Hat

I gave N. her Snoopy hat yesterday when we went to see the "Peanuts" movie.  She loved it.  It's a free pattern by Sarah Zimmerman, and it's available on her website, Repeat Crafter Me, or on Ravelry. 

Notes:  Yarn: Vanna, white and black.  H hook.  Teen/Adult pattern except stop after Round 8: 60 HDC.  Diameter of circle is about 6.5".   Skip round 9.  Rounds 10-21 on 60 HDC: Stop when the hat is almost 7.5" long.  Finish with a round of SC in each stitch around.  Sew ears on slightly forward. I used a tapestry needle and long thread of black to do a lazy daisy chain for the mouth instead of making a chain and sewing it on later. 


Ozark Fiber Fling in Steelville, Mo.


The Ozark Fiber Fling is a wonderful fiber festival in Steelville, Mo., in Nov. each year. There are classes in knitting, spinning, felting, crochet, preparing fiber, and more.  There's a good selection of vendors with lots of yarns, fibers, fleeces, books, and supplies.  The classes are very reasonably priced, and you can camp out in the building overnight if you'd like.  It's a great opportunity to learn new techniques.  They are planning classes for next year and are open to suggestions.  Here are some pictures of the vendors.

Ann Anderson was there teaching double knitting and shadow (illusion) knitting.  She showed us some of her beautiful double knitting scarves.  She was working on the grey scarf.

She does double knitting by holding the yarns in both hands, so one color is in each hand.  Her tension is great, which can be difficult with double knitting.  I was hoping to take her class, but I couldn't make it that day.

Susan Wilson, an expert finger weaving artist, was there teaching classes and selling her beautiful finger woven scarves.  She taught the diagonal weave for beginners and the arrowhead pattern for those with some finger weaving experience.  Here's my class sample.  It's fun to do and takes practice to get the tension right.

Here are some of Susan Wilson's  beautiful scarves: an arrowhead flame stitch pattern, a chevron pattern, and a lightning pattern.  She has some of her works in museums.


Here's a video of Susan finger weaving the arrowhead pattern.

Wednesday, October 14, 2015

Francie Turnure and her Beautiful Hooked Rugs at FCFG

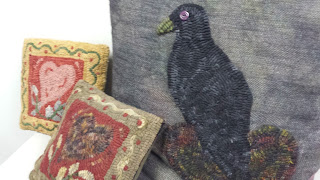
The FCFG really enjoyed having Francie Turnure speak to us tonight about rug hooking and show us her beautiful hooked rugs.  Francie has been rug hooking for about 20 years.  A crow design was her first small rug hooking sample that she made.  She said it was hooked tightly, but it lies flat, which is important for hooked rugs.

Her rugs are in the tradition of Primitive Rugs.  She told us that the other category of rug hooking is realistic style rug hooking.  Both types of rug hooking are Folk Arts. Rugs are hooked by pulling narrow strips of wool fabric through a backing.  In some areas of the country, they used wool yarn also in hooked rugs.  The loops of the rug should lie together like ribbon candy.

Francie lives in an 1839 barn that has been turned into her home.  She says the rugs fit in very well with her country decor.  Here is Francie holding her beautiful rug that she hooked with the year 1839, since that is the year that her barn was built. She does use some of her rugs on the floor to walk on, and they look great and have held up very well.  For a wall decoration, Francie recommends using a strip of carpet tack to hang your rug on the wall. 

Here is a close-up picture of her beautiful 1839 rug.

Francie began her presentation with a poem called, "What Art Means to Me," by C. Valentine Kirby.  She told us that the English brought over the tradition of rug-hooking on ships, and it helped pass the time on the long voyage.  Rug hooking was also born of necessity in the United States.  The rugs were used early as bed covers, which she said would have been warm but very heavy.  They were used on bare floors or wooden floors.  The oldest remaining hooked floor rug is from June 10, 1850.  The rugs were made using natural American fibers of wool and flax.  The rugs made with burlap have not lasted well.  She said that burlap will eventually turn to dust.  She said that linen is a good base fiber to use because it will last and also, if you take out a section of your rug hooking, you can easily close up the holes again by scraping the holes with your hook.  She does not like using Monk's Cloth or a wool backing.

She had some holiday rugs to show us.  Here is a lovely Christmas rug and a cute Drummer Boy rug.


We loved her Halloween rug.


Here are some more of her lovely rugs.
She had rug hooked pillows to show us.  She said that no two rugs are alike.  If two people make the same pattern, their rugs will look different.  She said that even if she makes the same rug twice, each will be different.  The two heart pillows were made by Doris and Francie, and you can see how different they look from each other, and both are so pretty. Doris' is the heart pillow on the left.

Francie showed us wool fabrics used in rug hooking.  She had wide torn strips of wool used in one project, and she uses a big hook for wide strips.  She uses plaid fabrics and showed us how the fabric looks in the hooked project compared to the plain fabric.  To get an idea of how a plaid will look, you can roll up your plaid fabric tightly and then look at the edge of the roll of fabric.  That's an idea of how the colors will look in your rug. She also had beautiful overdyed wool, which had splotches of color on it.  She doesn't dye her own wool, but she said it can be dyed in casserole dishes or crock pots.  She has cutters for cutting the strips of wool into various widths.

Francie uses various sizes of hooks, depending on the width of the fabric she is using.  She showed us her favorite brand of hook, which was a Primitive size hook, and it had a round wooden handle.  On the handle is a flat spot for your finger.  She said the brand name of the hook is a Hartman hook. 

She had two square wooden rug hooking stands for us to use to try rug hooking.  She also demonstrated the technique for us.  The stands have a strip of carding cloth on the edges to grip the backing fabric.  The stands were portable stands to use on your lap.  Her stand at home is a stand that swivels and tilts, which makes it convenient to hook in any direction. 

You can buy patterns for rug hooking, and she showed us a pattern of a sailing ship that she will be starting soon.  It is marked on the backing fabric.
Francie said that when you start hooking a rug, you start hooking the design first before hooking the background.  She said that you want to be sure to have at least 2 rows of straight edging of loops around your piece.  She hooks by first bringing up the tail of the fabric.  She brings up a loop of fabric right next to the tail, and then skips a hole when bringing up the next loop.  She said the first row is more difficult, but subsequent rows will help support the loops.  She skips a hole between loops so the fabric won't be hooked too tightly.  She worked the loops toward herself when demonstrating for us.

Francie mentioned some suppliers of rug hooking patterns and other supplies:  Wooly Woolen in Independence, Missouri, and Prairie Road Designs. The Prairie Road Designs website is www.prairieroaddesigns.com and the Wooly Woolen website is www.woolywoolen.com .  Doris' pillow design was from a booklet called "Needle Love."

Thank you, Francie, for a wonderful evening of rug hooking!